
.avif)


Mobile App
You now have access to the Mobilo app, where you can manage your account and profile, and keep your contact details up-to-date. Whether you use the web version or the mobile one, the tabs and buttons are the same.
Web version:
App Store:
https://apps.apple.com/us/app/mobilo-card/id1520791968
Play Store:
https://play.google.com/store/apps/details?id=com.mobilocard.mobilo_flutter_v3&hl=en&gl=US

In the web app, here are the buttons and what they do:
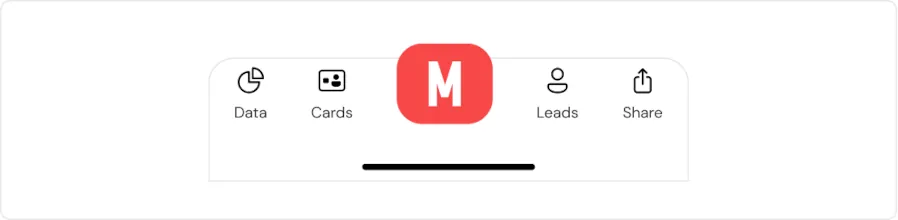
- The Dashboard button will take you to the main page where you can see the live stats and the card taps.
- The Profile Settings button is the main one. Here you can add your contact details and social media links.
- The Leads button will show you the f collected and a board where you can keep them organized.
- The Cards button will show you the cards you have assigned and you can change the modes from there.
- Team: this is the admin panel where you can manage the organization settings and the users’ profiles as well. We’ll cover it in the next section.
- The Email Signature button will create a generic signature using the information you have on your profile. You can add it to any document or your personal or corporate email signature.
- The Settings button will allow you to see your email address, change your password, contact support, and see our Privacy Policy.
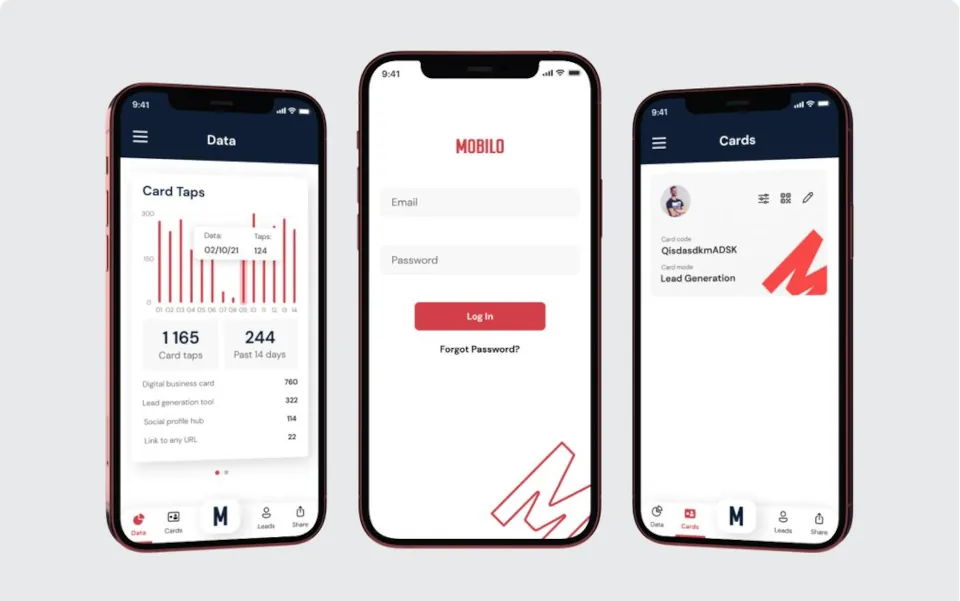
In the mobile app, these are the buttons and what they do:
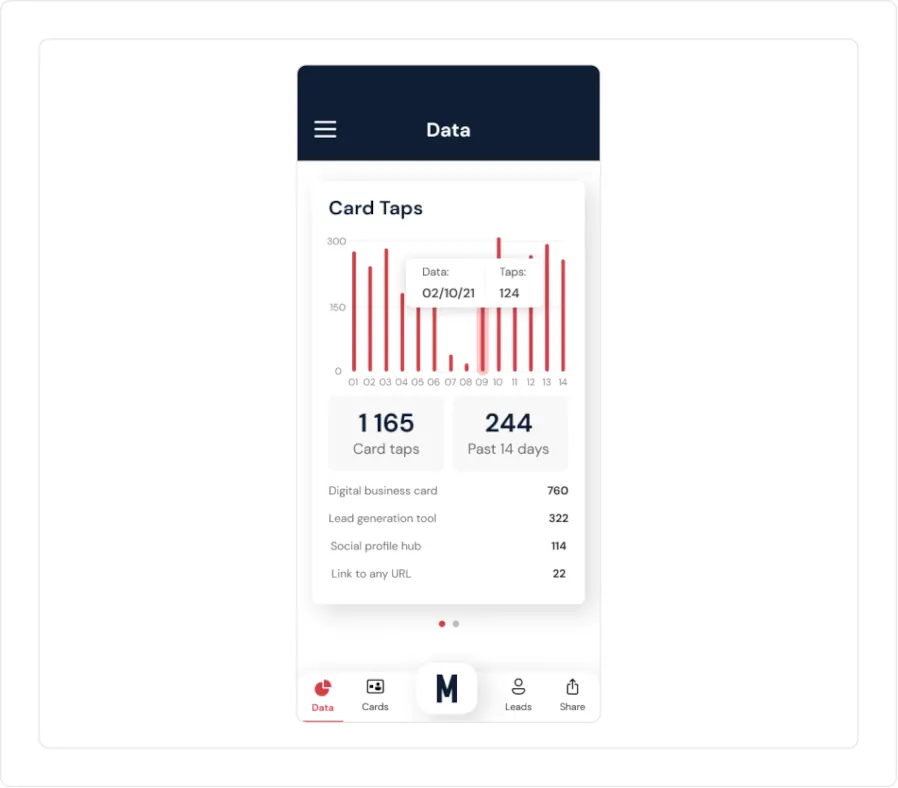
- The Data button will show you the card taps and the leaderboard of your team.
- The Cards button will show you the cards that you have assigned under your account, and from there you can generate the respective QR code, as well as to change the modes of the card. Click here to learn how to switch modes.
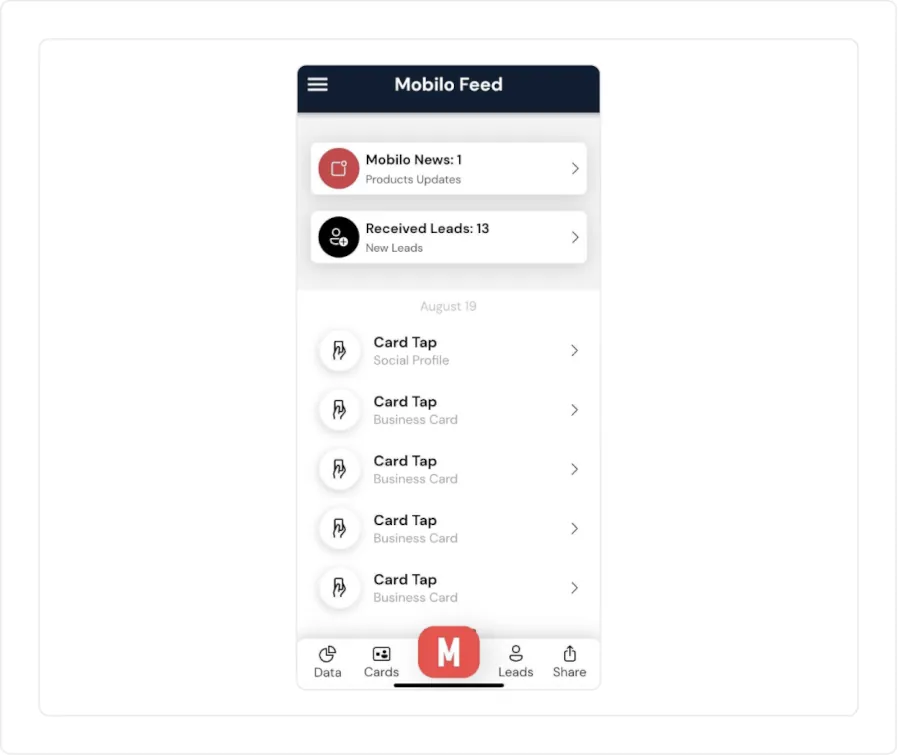
- The M button will take you to the Feed, where you can see more specific data about the taps received (date, mode, or link clicked).
- The Leads button will show you the leads you have collected so far and will give you the option to contact them via email, phone, or text message.
- The Share button will show you the QR codes in the different modes. You can preview it so other people can see it, or directly share it via social media, email, or text message.
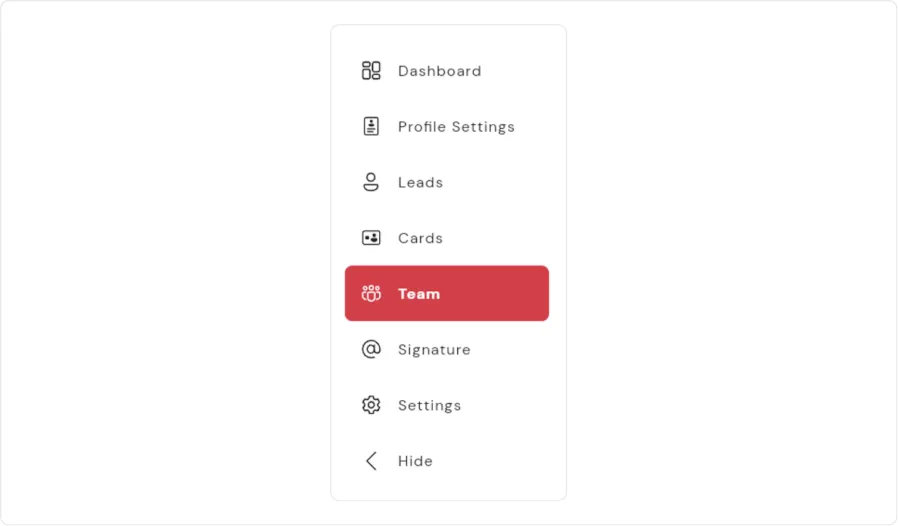
Admin Panel
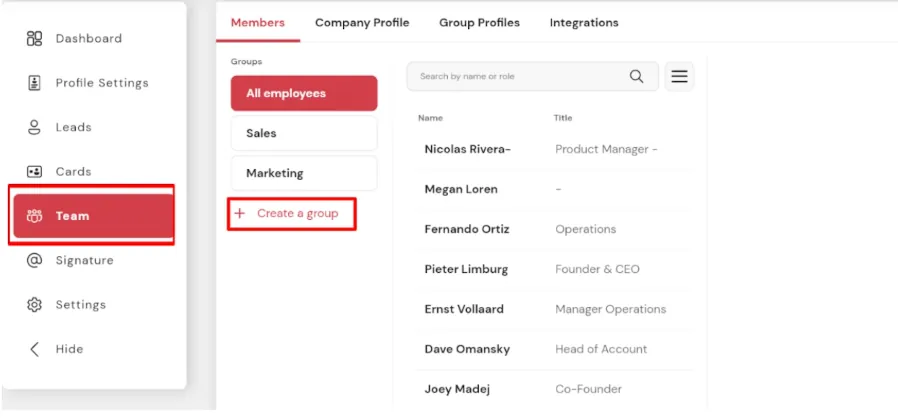
Here comes the fun part of being an admin. You get to control what information to will be shared and what information can be edited by the other members of your organization. To access the admin panel, click on the Team tab that you’ll see on the left side panel.
Let’s start by checking what’s in each tab, shall we?
1. Members tab
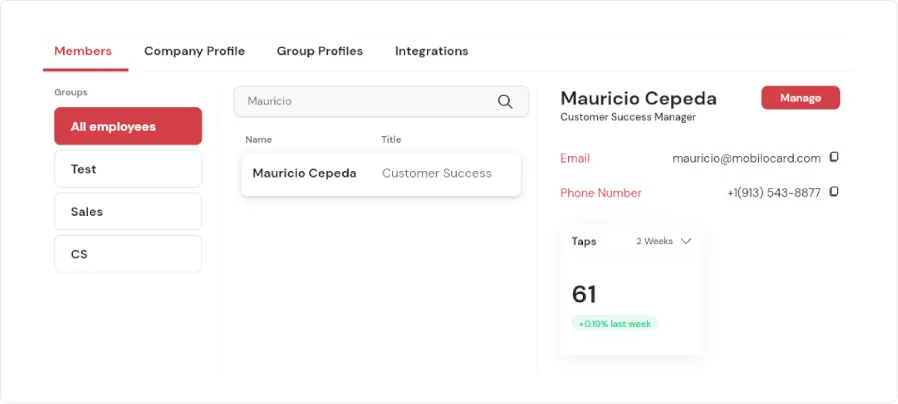
On the Members tab, you will see the list of all the users that are part of your organization. If you have groups, you will also see them listed and by clicking on a group you will see the respective users added to each group.
If you click on the name of a user, you will see (to the right) some generic information about their profile and their stats. Click on the red button called “Manage” in order to access their profile and edit any information for them. Once you save the changes, the user will see them reflected once they tap or scan the card.
You can also manage their cards. By scrolling down until the bottom of their profile you will see the cards that the user has assigned. If you click on it, you will see an additional menu at the left:
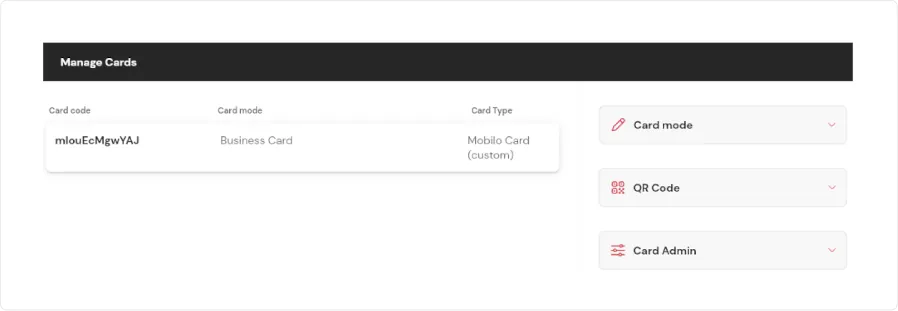
- Card mode: It will allow you to switch the card modes for that particular card.
- QR code: It will generate a QR code that you can read just to check the information is properly placed.
- Card Admin: It will allow you to reassign the card to a different user, or to release it so it’s no longer assigned to anyone.
2. Company Profile tab
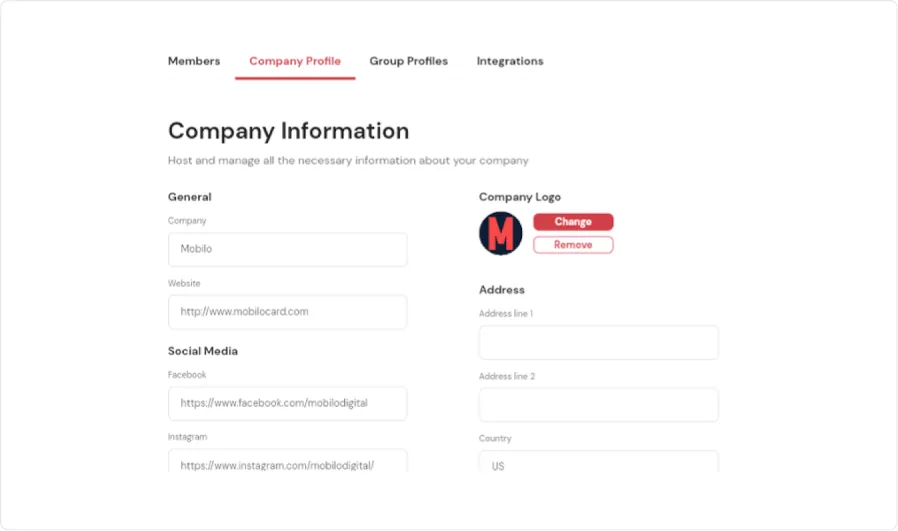
On the company profile tab you will be able to add all the information about your company: Name, website, social media links, address, and logo. But that’s not all! You can also control the information that will be editable by the other members and what will be shared as well.
You will find 3 panels in this section: Override Controller Panel, Show Fields, and Lock Fields.
Depending on the size of your screen you will see the panels next to each other, or you will need to scroll down to see them.
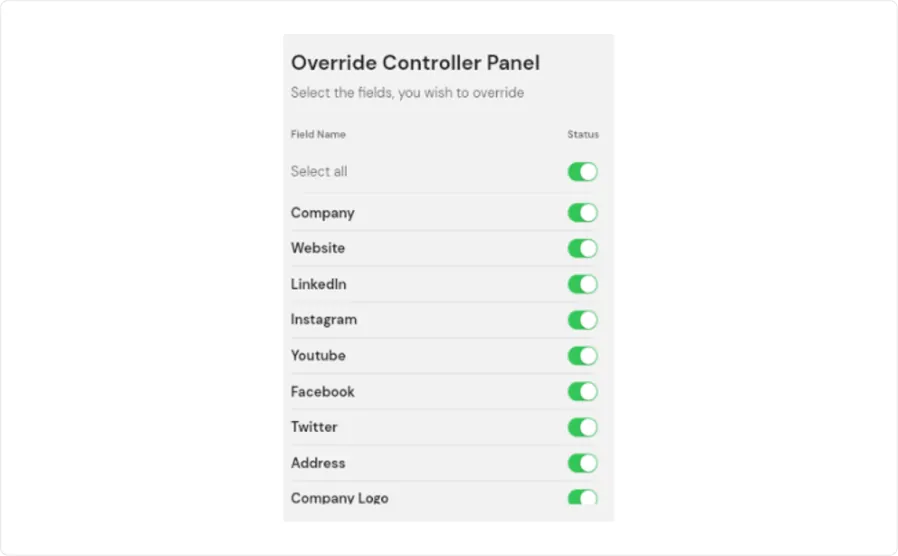
Override Controller Panel: This panel will allow you to select which of the fields you filled out in the Company section (see above).
If any of these is toggled on (green) it means that it doesn’t matter what information the users have on their profiles, whenever they share their contact details the information that will show up is the one that’s set on the company profile.
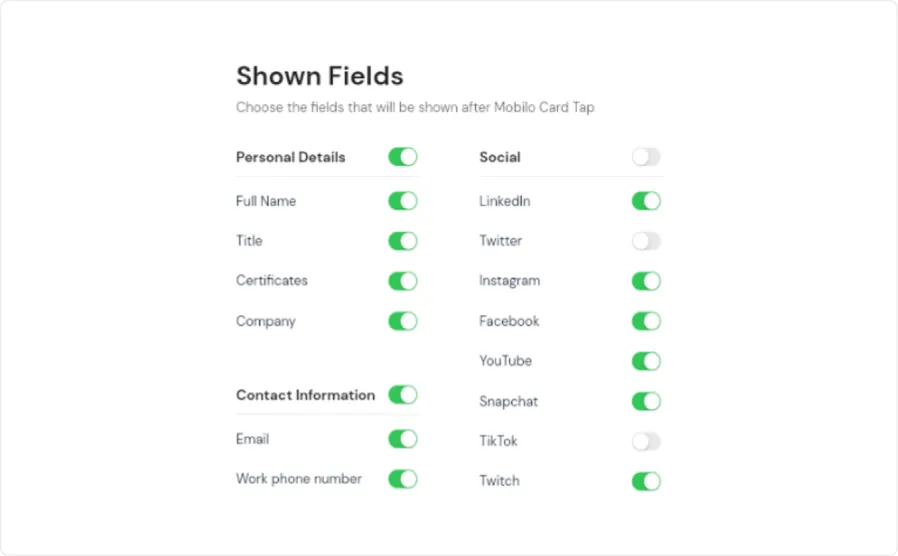
Show Fields: This panel is used to control what information will be shared. If any of the fields is toggled on (green) it means that the information on that field will show up when the card is tapped or scanned.
If the field is toggled off (gray) it means that even if there’s information on that field, it won’t show up once someone taps the card
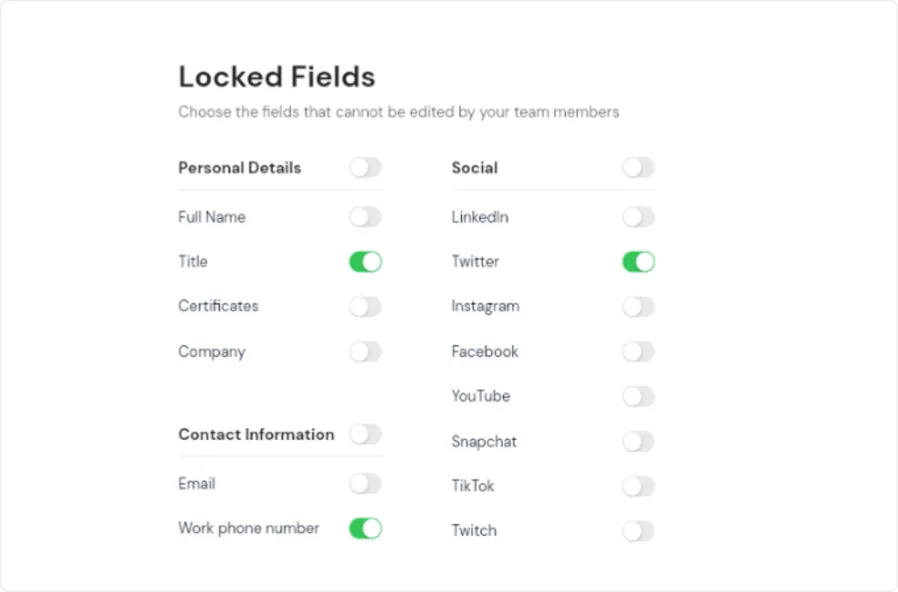
Locked Fields: This panel is used to control what information can be edited by the other members of your organization.
If any of the fields here is toggled on (green) it means that the users won’t be able to add or modify the information on their profiles. They will see a little lock icon next to the field.
If the field here is toggled off (gray) it means that the users can edit modify the information of that field if they want to.
3. Group Profiles tab.
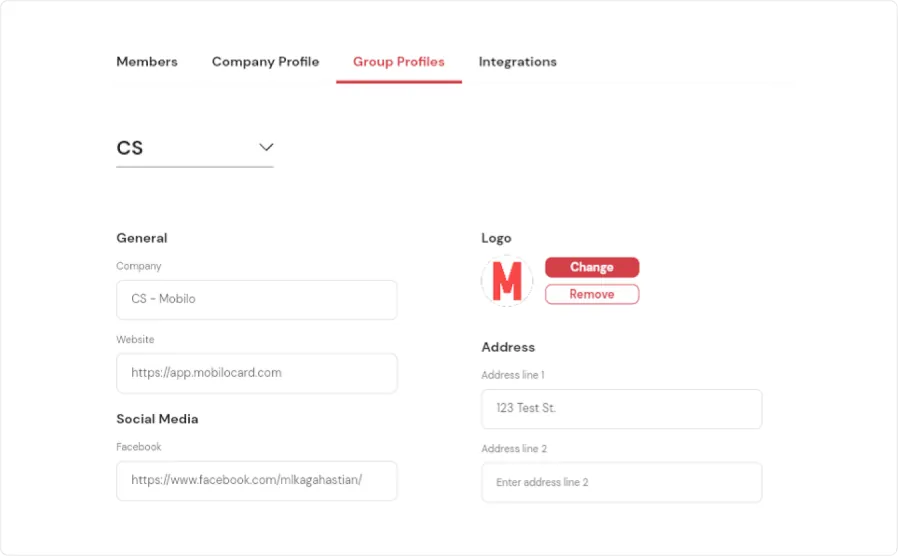
Groups are an amazing option if you want to have separate settings for separate people. You can divide people per department, location, branch, levels, or any other kind of division you may have in mind. Once the groups are created, you will be able to see a drop down to manage the settings for each group. (the settings are the same as the ones you saw in the Company Profile tab!)
At the moment is not possible to have sub-groups (groups inside a group).
What are the new admin features for teams?
More features, more efficiency! With team licenses, manage your company profile, team members, and more. Now on top of that, because in Mobilo we always want to improve our users’ experience, we have added more functionalities to make the admins' lives easier. Let´s break them down together.
Groups made easier
Now you can create groups within your team with just a couple of clicks.
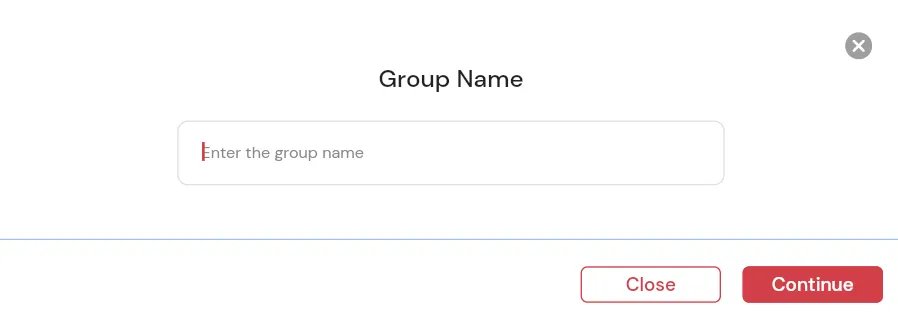
- Go to app.mobilocard.com, click on “Team” and then on “+ Create group”
- Give your group a name and click on “Continue”
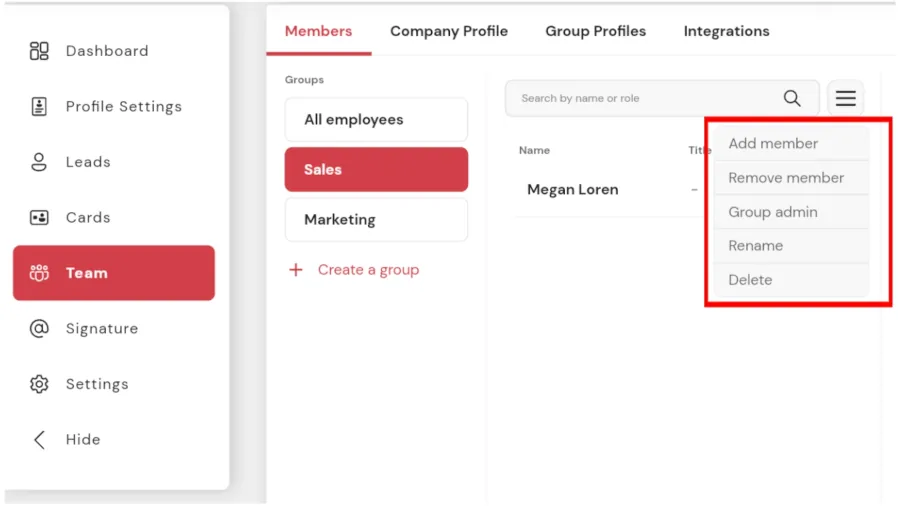
- Click on your newly created group. To add members, set up a group admin, rename or delete the group you will find a menu icon next to the search bar.
Pro tip: Some of our customers use the groups feature to divide their employees by departments, locations, and even subsidiary brands of their company.
Powered up Super Admins
The members tab in your admin panel has the option to add more admins or delete accounts. This is done just by clicking on the menu icon next to the search bar.
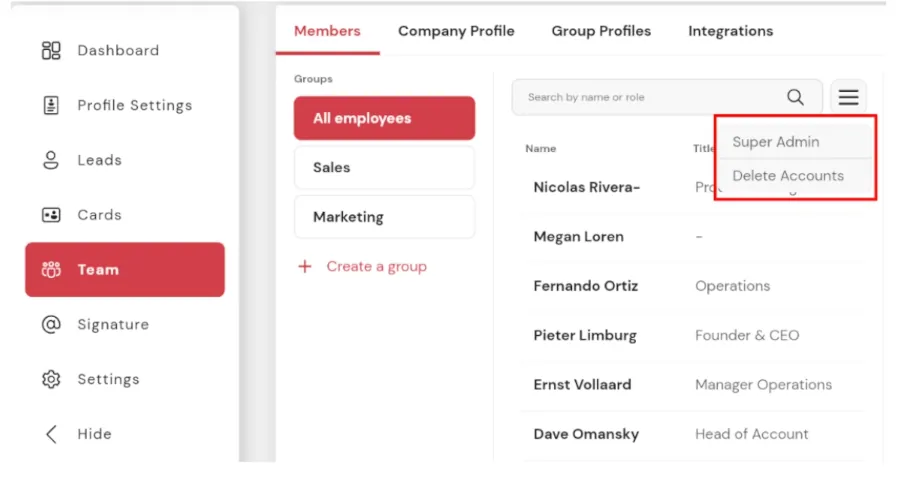
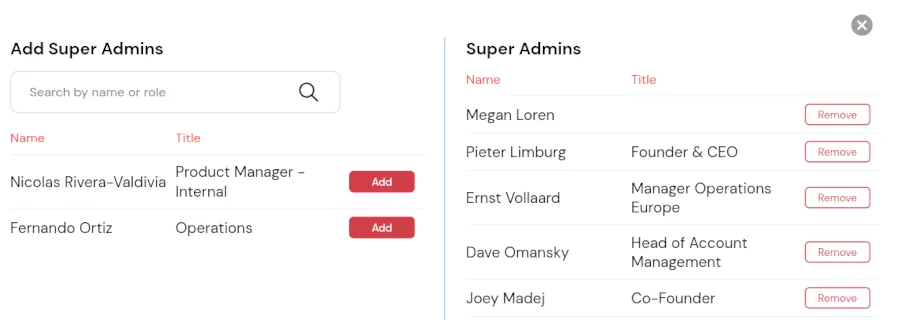
You will be able to add or remove administrators with a simple click. This is what you’ll see.
If you have employees leaving your company, now you can delete their user and access to your organization. Once you click on delete accounts this window will pop up.
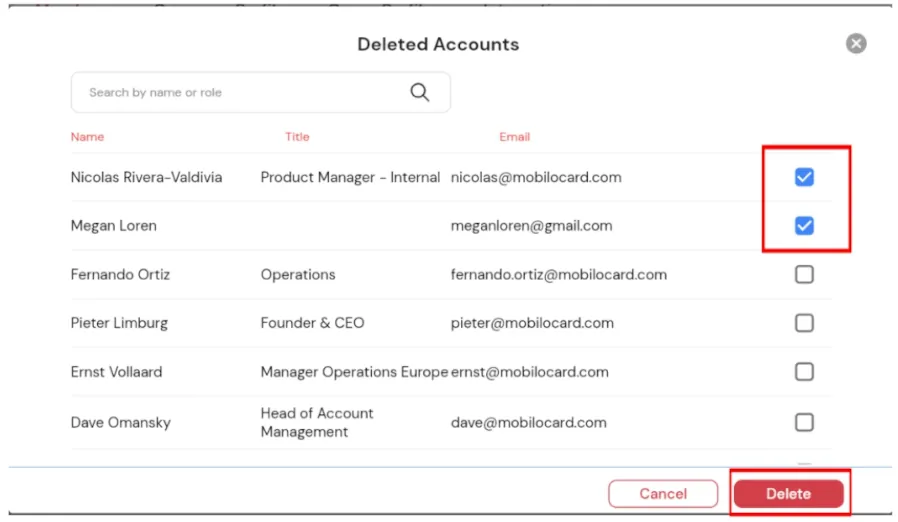
Select the box next to the account or accounts you want to delete and then click on the red “Delete” button at the bottom right of the screen, as seen above.
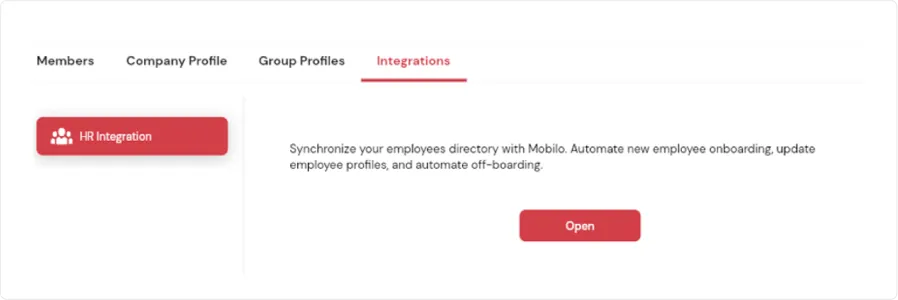
4. Integrations tab.
The last tab within the admin panel is the integrations tab. It will allow you to do a mass update in case you need to update the contact information of all the people on your organization at once.
All you need to do is click on “Open” and the submit the file that you will see at the left side of the screen. If you need assistance with this feel free to ask our support team for the detailed step-by-step documentation.
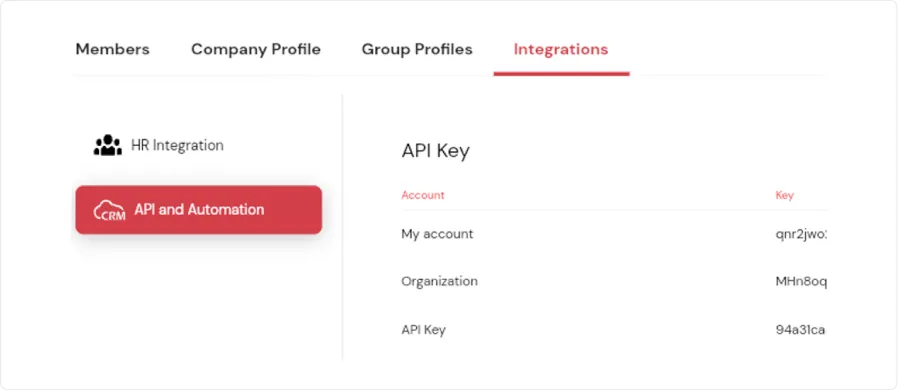
If you also have the CRM license, you will see an additional tab under HR integration called API and Automation so you can grab the necessary keys to complete the connection. For more information on how to connect your leads to your CRM please visit: https://www.mobilocard.com/zapier-integration/menu
Let’s update your profile settings!
From the mobile app, let’s tap on the menu that’s at the top right corner of the screen and then tap on Business Card Profile.
From here you will be able to add a profile picture, all of your contact details, your social media links if you want to, and more! Pretty easy, huh?
Let’s explore the 4 modes of your card
Did you know your card can be used in 4 different ways? Networking has never been better!
Depending on what you want to achieve, you can share your contact information using these modes:
- Business card mode: Is the standard mode, and the most used one. Simply tap your card into a phone and your contact data will be displayed as a new contact for them to save. It will include all of the information you have added in your profile settings.
- Social profile mode: A cool way to introduce yourself. Before sharing the contact details, show them a landing page first. Definitely an impression hard to forget. Once they’re tap on “Save Contact” they will see the business card to add to their contacts.
- Lead generation mode: What if you not only want to share your information, but also collect other people’s info? No problem. Use this mode so you can create a form for other people to fill out when they tap your card. You can even add custom fields if you want to request more than just the basic data! Once they fill out the form and tap on “Submit” both you and the other person will receive a text message with each other’s contact information. And what’s best, the information will be stored within the app so you can revisit it at any time and contact them as well.
- Link to URL mode: Let’s say you’re not interested in sharing your contact information, but you prefer people to go straight to a website. Totally doable using this mode. All you need to do is input the link of the website and that’s it! People will be redirected to that page once they tap the card. It can be any website: Your YouTube Channel, your company’s web page, your Instagram feed, your LinkTree, an article you wrote, a file in your Google Drive, or any other link you may think about.
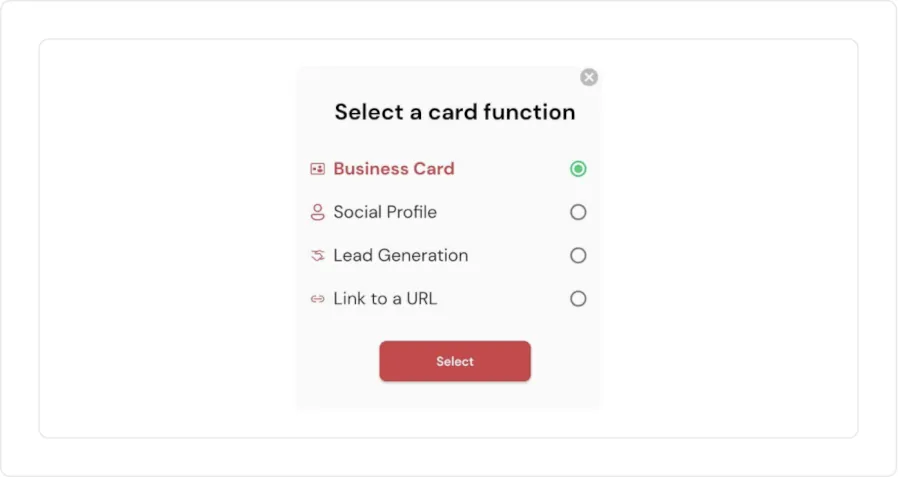
Now how do you switch from one mode to another? Easy peasy. On the mobile app just go to the “Cards” button at the bottom of the screen so you can see your card listed. Then tap in the filter icon (then one next to the profile picture).

Once you click on the filter icon, you will see the option to choose the mode you want to use. Tap on the little circle next to each mode, and then tap on “Select”. And that’s it!
Using Lead Generation Mode
When you use your Mobilo card in the Lead Generation mode, your card tap will share a form which the lead or prospect can fill their details in. Once the form is filled, both of you will receive each other contact information via SMS.
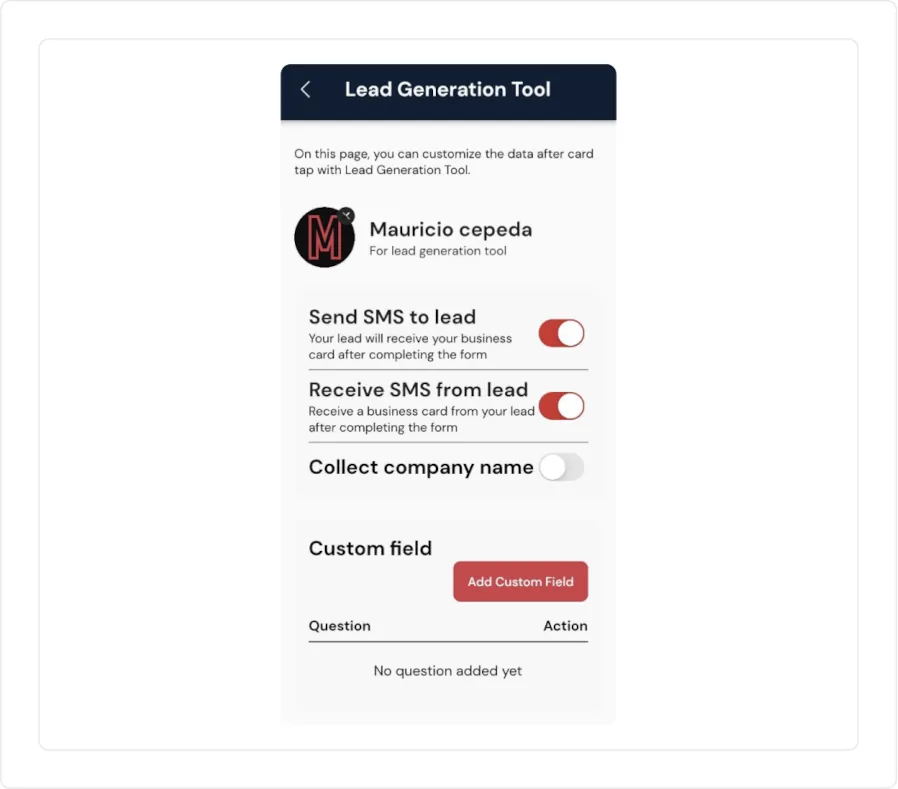
Make sure to log in to the mobile app, tap on the menu at the top left corner, then tap on Lead Generation and make sure to check the information you want to collect. You can add custom fields too!
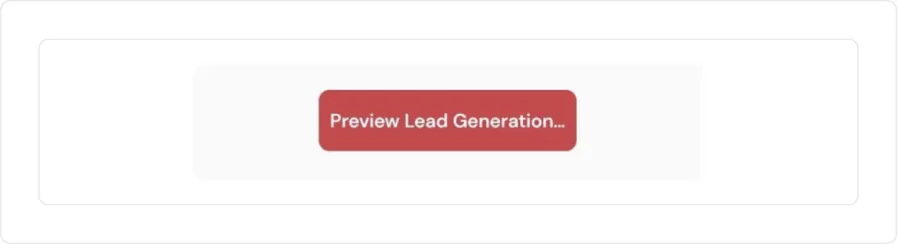
On the same page you can get a preview of your form by clicking on ‘Preview Lead Generation form”.
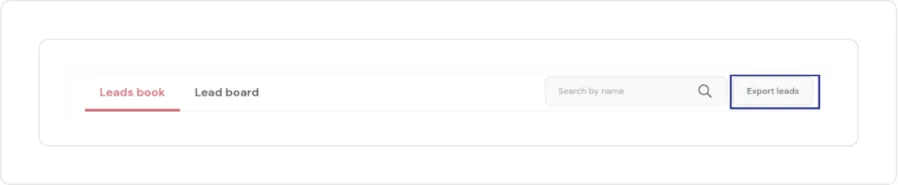
Looking to export your leads into an excel file or a CRM? You can do so from the web app. Log in to https://app.mobilocard.com/ Click on “Leads” and then click on “Export leads” and a CSV file will be generated with all of your leads’ information.
When to use the lead generation mode
You can use this mode when you’re expected to be in a high-volume interaction like a networking event, trade show or an open house.
How to switch modes
From the home page, tap on the “Cards” button, then tap on the filter icon that’s next to your profile picture:
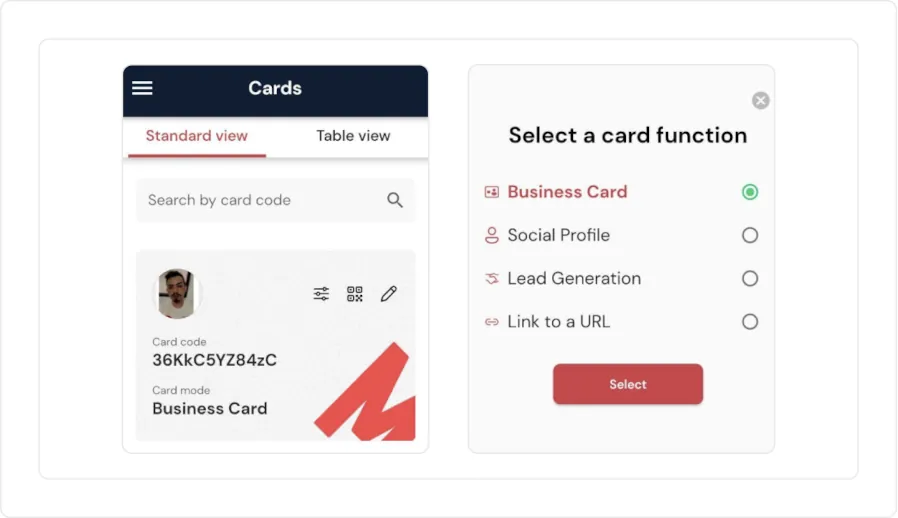
You can click on the one you want your card tap to function as - Business Card, Social Profile, Lead Generation or Link to a URL. Once you click it, the switch will be made and you will see the mode below the card code.
Let’s explore other features within the app!
The app has other exciting features that provide you with insight about the usage of your card.
One of the most interesting ones is the feed. By tapping on the big red M on the bottom of the screen, you can see the feed with news and updates, the leads collected, and the number of taps received. Not only that it will tell you exactly which mode you were using when they tapped your card and if they click on any link, you will see it there as well!
And it doesn’t end there. If you tap on any of the card taps, you will see the exact time, date and location from where your card was tapped or scanned. Pretty awesome right?
There’s also a cool dashboard where you can see a graphic representation of these same taps. To see it, tap on the first button at the bottom of the screen called Data.
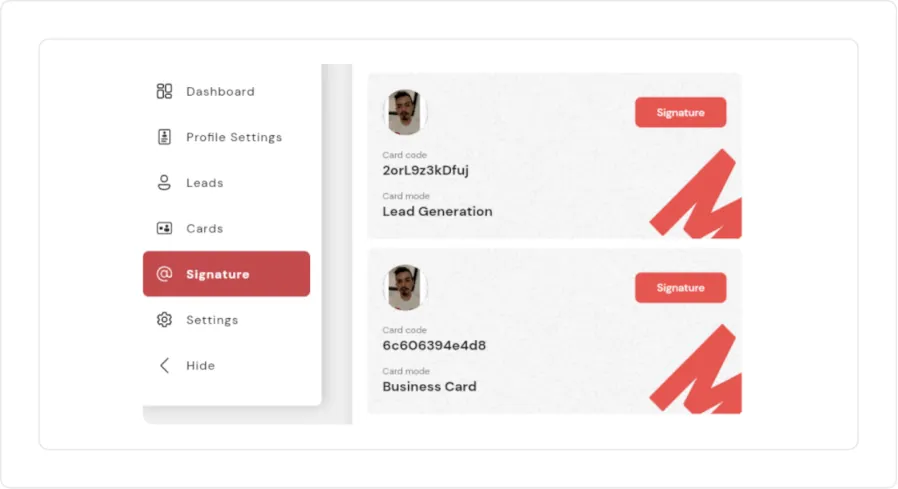
Another cool feature we have available is an automated generated email signature. You can grab it and add it to any document or to your personal or professional email.
All you need to do is to log in to the web app, click on the Signature tab, click on the signature button that’s next to your profile picture and that will open a new window where you can grab the signature from. It will even include your QR code!
Next up, sharing your contact details using a QR code (yes, we thought about everything).
Let’s say you forgot your card at home, but you still want to share your contact information. No biggie. Open your mobile app and generate a QR code for people to scan that will show them your information.
All you need to do is to tap on the icon at the very bottom right side of the screen called “Share”. Once you click on it, you can swipe left to select the one you want to share: Contact details, social landing page, or lead generation form:
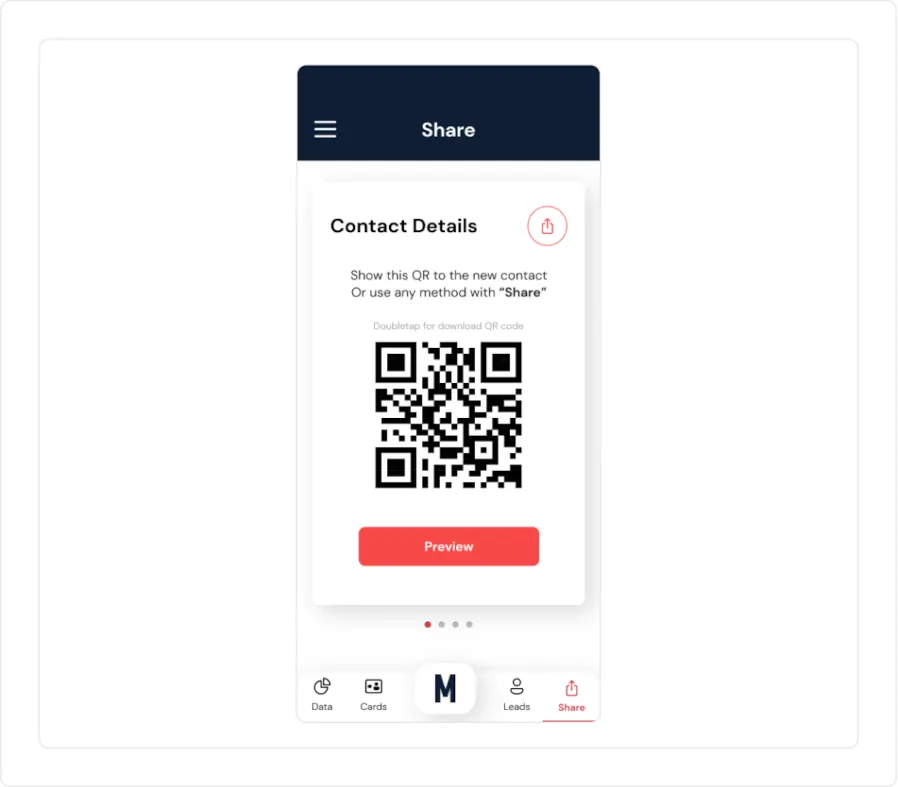
Also, if you click on the icon that’s next to “Contact Details” You can send your contact information via text message, email, WhatsApp, or any messaging app. Pretty dope if I do say so myself.
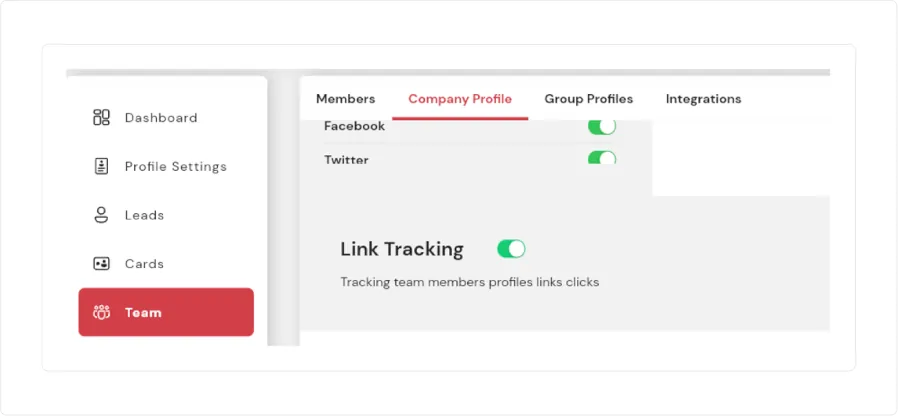
Link tracking
Have you noticed that when you scan your card, the links come with a mobilo.link part before the actual link? This is because of Link Tracking.
The Link Tracking feature makes it possible to track down the statistics related to the URL links added to your profile. If you open the 'Link Click' on your feed, you'll be able to access more relevant info such as date and time, and location with a map:

The link stats give you a breakdown of all your links added to your profile along with the total link clicks. These statistics make it easier for you to understand the performance, pattern and efficacy of your interactions.
If you wish to turn off your link tracking, you can do so from the web app. All you need to do is click on the Team tab, then click on the Company Profile tab and then scroll down until you see the toggle for link tracking:
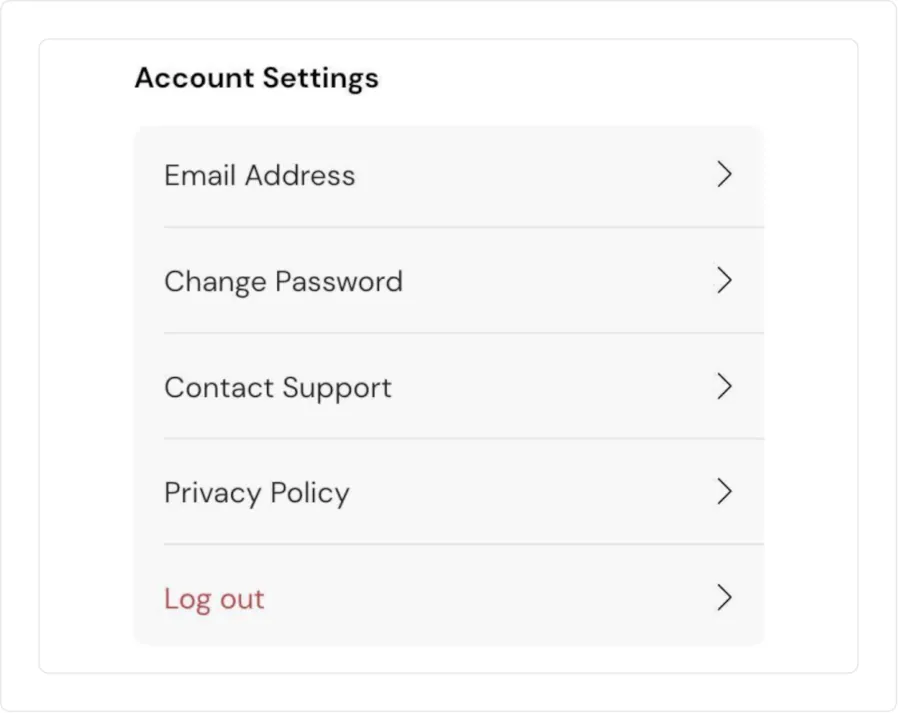
Settings
Last but certainly not least, we have some account settings. You can change the email address you use to log in to the app, update your password, review or privacy policy and contact our support team from the app as well. Tap on the menu at the top left corner of the screen so you can see these settings.
Tapping with confidence
There are certain phone models that allow for NFC technology. Here is the device compatibility article: https://www.mobilocard.com/support-articles/compatible-devices
Furthermore, there are certain "sweet spots" for iPhones and for Androids:
iPhone:
- Make sure the phone is lit up before tapping.
- Tap your card on the top back part of the phone (next to the camera).
Android:
- Make sure the phone is lit up before tapping.
- Tap your card on the back center of the phone.
** Please remember that for Metal cards, you need to tap the card with the colored side facing the phone.
In the event you come across an older modeled phone or a device that has disabled NFC you always have the QR code as a backup. Kindly ask the person to open their phone’s camera (no special app is needed) to scan the QR code. QR codes are compatible with almost all smartphones.
